Applying Warhammer Decal Transfers
Hello fellow hobbyists!
Josh again with an article on how to apply decals. A friend of mine showed me how to make applying decals onto models way easy using a few simple techniques. The results were so good that I thought I would make a quick how-to article on it! Therefore, if you want to apply decals to your models like I did to my Astra Militarum, feel free to gather the below materials and follow the detailed steps. Enjoy!
Required Materials
- Bowl of Water
- Large Basecoat Brush
- Small Detail Brush
- X-Acto knife with fresh blade
- Citadel ‘ardcoat Technical Paint
- Citadel Lahmian Medium Technical Paint
- Decals
- Model for Decals

1. Prepare the Model
Before applying the decal, be sure to you have the model base coated and layered in the area in which the decal is going to be applied. Depending on the surface, washes and dry brushes can be applied after the decal is applied. This should be pretty obvious but still should be stated since it will be extremely difficult to apply any additional base coats or layers after the decal is applied.

2. Cut out the Decal
When cutting out the decal be sure you either have a fresh blade on your Xacto knife or a recently replaced blade. This is important in order to ensure you slice through the transfer sheet in one cut rather than having cut through it multiple times. Additionally, it helps to get as close to the decal as possible to allow for it to fit in small places.

3. Soak the Decal
In water, start soaking the decal in order to remove it from the paper backing. The Games Workshop decals took about 30 seconds to a minute for the decal to easily separate from the paper back. While the decal is soaking, move on to step 4.

4. Paint on ‘ardcoat
While the decal is soaking, put ‘ardcoat on the part of the model in which you want to place the decal. This helps you move the decal more easily while placing it on the model, ensuring you put it in the exact spot you want.

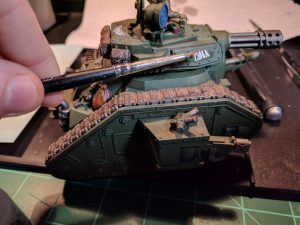
5. Remove Decal from Water and Apply
After the ‘ardcoat is painted on the model, pull the decal out of the water. This is most easily done with a paint brush. I would avoid tweezers for this step as it could harm the decal. The paint brush can essentially “paint” the decal off the paper backing and onto the brush. Practice makes perfect with this step. After you remove it from the water, keep it on the brush and place it on the model where the ‘ardcoat is. Be sure to use the paint brush to adjust the decal into the exact spot you want it.
6. Paint on more ‘ardcoat
In order to help seal the decal onto the model, paint on more ‘ardcoat onto the top of it. Don’t be afraid to apply quite a bit of ‘ardcoat to the decal to seal it.
7. Layer on Lahmian Medium
After the ‘ardcoat is applied, our decal and the surrounding area is way too glossy. Therefore, let’s tone it down with some Lahmian Medium. The Lahmian Medium will put a mat finish on the glossy area and help our decal blend into the model. Don’t be afraid to apply multiple layers of the Medium in order to tone down the gloss.

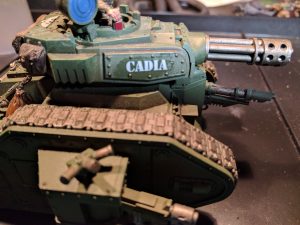
So there you have it, a fresh looking decal on my Leman Russ! I’ll need to add some scratches and weather it a bit but it is looking good so far. What other methods have you used to apply decals? Any other tips or tricks? Feel free to comment below!
Until next time, happy hobbying!
Josh

What about the shoulder pads of space marines? Does this method smooth out the decals on curved surfaces?
Hey Stanley,
I haven’t applied decals on space marine shoulder pads but it definitely should. I’ve used this method to apply guardsmen shoulder pad decals and it works like a charm. Just make sure to dry your brush a bit before grabbing the decal out of the water and you should be good to go. I also sometimes use two brushes (one with the decal and one dried out brush) to apply the decal.
Hope this helps, happy modeling!
-Josh